
Pr tracking
TIP
First, you should know that Premiere Pro has no built-in motion tracking, but the effect mask in Premiere Pro does have tracking. This tool converts the mask's motion into Transform properties, which gives you the tracking effect. Below is the tool's interface.
How to use Pr tracking
On the extension home page, click the button at the bottom center, then click in the sidebar.
Compatibility
This is a Lab feature available since LmBox Bridge V1.1. It needs Premiere Pro 2021 or later. Version 3.7 brought a major update, with the interface and flow redone. See the extension release notes and the differences on this page.
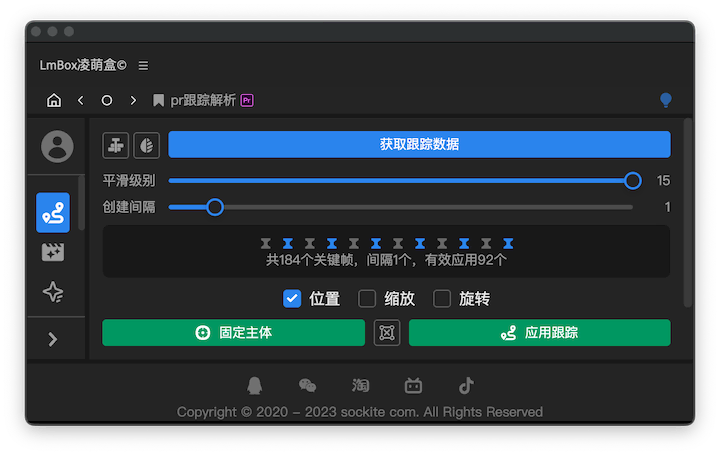
Parameters
- Nest the selected clips
- Add the
Gaussian Blureffect Get tracking: reads the tracking data from the selected clip.Smoothing level:this slider smooths the tracking data. When the shake rate is high, lower it, so unneeded tiny changes are reduced effectively.Create interval:another anti-shake strategy. If your footage shakes at a high rate, lower it a little, which means position data is created only every few frames.Position, Scale, Rotation: Premiere Pro has no 3D camera, so it cannot deform perspective, and the anchor point has to be adjusted by hand. Scale and rotation depend heavily on the anchor point, so turning them on is generally not recommended.- A feature of the new version (video). It applies the tracking data to the tracked object so the subject stays pinned, which suits product shots very well.
- Reset the transform effect
- Apply the calculated result to the object you added. Video.
Old vs new
Differences from the older version 👉 extension release notes
- In the new version, once tracking is done, you do not need to do anything else. Just click Get tracking.
- The new version uses the
Gaussian Blureffect, and the panel has a built-in button for it. - The new version has a built-in transform reset, in one click.
- The new version has a built-in one-click nesting.
Workflow
- Add the
Gaussian Blureffect to the clip you want to track, create a mask, draw the target point to track, click Track Forward, and wait until tracking finishes (you can also stop it manually). - Click the
Get trackingbutton on the LmBox Bridge panel. After you get the data, adjustSmoothing levelandCreate intervalas described in Parameters. - Click Pin subject, or drag the clip to be bound onto the timeline, then click
Apply trackingand wait for the process to finish.
Tip
Width and height are not calculated yet, so please nest the bound clip before you apply the tracking data.
Video demo
Pin the subject
Some footage and ideas in the video come from the Yingshi Jufeng (Film Hurricane) team. Their website is ysjf.com. Thank you for sharing the idea.
Motion tracking
Motion tracking for Premiere Pro clips, covering the main flow (older version)
Tracking Essential Graphics in Premiere Pro, a supplement to the tutorial above (older version)